
A Favorite Companion--A Hiking Stick--And How to Make One
When I was younger I lived near a State Forest, and for a kid, there is probably nothing better. It gave me an appreciation of nature, a bit of independence, and tons of things to explore. Part of the forest was a fish hatchery for the state of Ohio and the other part was just forest. It was not a tourist place, so there were very few managed trails (none in fact) so me and my childhood friends did a lot of the trail making. During those days, weeks, months, and years exploring I always had a hiking stick of some sort. Usually it was a straight piece of maple with the bark still on, but I never when into the woods without one. It helped me leap across streams and get balance on a log that had fallen over a ravine. It helped me keep pace while walking. It helped me cut down spider webs that traversed the paths we were making. It also helped me keep my balance while wading in the stream for crawdads.
As an adult, moving away and going to college and then law school and now into my own home, those hiking sticks are long gone. But with a new little boy, my wife and I have started walking and hiking again. So I went out into the woods near my current house (no where near as impressive as the sweep of emerald green that surrounded my neighborhood when I was a kid) and found a stand of young maple. They were part of a deforesting effort to get a passenger rail system into my current town, so the stand is full of thin, straight maple. There are too many to have all of them survive and even now, some of the smaller ones are dying out. They are sugar maple and they grow in nice, straight stands. They also make excellent hiking sticks.
Here is my current stick:
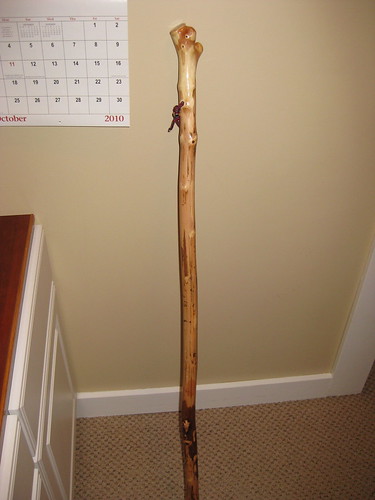
and a close up of the "handle":

The hiking stick has probably about 600 miles on it right now and it has held up well. It is something I carry every night when we go for a walk or any time I am hiking. In addition to their wilderness utility, they also make great defensive items, if need be, something short of a knife or a gun and much more innocuous looking. They beat the tar out of the aluminum ones in terms of style. Below is a tutorial on how to make your own.
Supplies You'll Need
You'll need:
1. A saw (a bow saw or a garden saw are perfect)
2. A length of PVC tubing with two end caps
3. Foam brushes
4. A putty knife or scraper
5. Different grit sand paper, I like 60, 120, 320 and 600, with a fine grit that can be used to wet sand (it will say "Dry/Wet" on it)
6. A length of cord (I used paracord)
it is nice to have:
1. A palm sander (Random Orbital type)
2. A belt sander
3. A Dremel rotary tool with rasp and sanding attachments
Selecting the Wood
Ideally you will use a hard, straight grained, wood. Closed grain woods (like maple) are superior for finishing compared to open grained woods (like oak and ash). Traditionally, hiking sticks were made out of hickory, willow, ash, or maple. Irish sticks were also made of blackthorn (which, technically, is a shrub and not a tree). Willow is a good choice if you want a "bark on" look. Hickory is especially tough and strong, which is good in the sense that it will take some abuse, but bad in the sense that it is very hard to work with. I would skip pine, though pine can be tempting because it is straight, light, and abundant. It is just not strong enough for this application. Also, if you can find a root that is straight, roots are denser wood than trunk wood, so they are more durable. Be careful though, because cutting up a root could kill the tree. If the tree is already dying, go for it, but otherwise cut off a branch or go after a small sapling. Maple is my preference. It is a nice combination of hard yet workable, straight, and closed grained. I also like the creamy heart wood's coloration and pattern. Sometimes you get lucky and find some crazy pattern or spalting.
Choosing a sapling is pretty easy. I like to have natural handles, so I always look for a crotch or branch in the tree. I also like them to be no bigger around than my index finger and thumb when making the "OK" sign. I then go down from there about 6 feet. You will cut off a bit of the end, so select more than you need. You can always make it shorter, but the reverse is not true. Finally, sight up the side of the sapling to make sure it is straight. It doesn't need to be poll cue straight, but the straighter the better. Then start cutting.
The stick should be one of two sizes: shoulder height for a staff and elbow height for a walking stick. I prefer the elbow height sticks. They pace your walking well and are easier to store and carry.
Making the Stick
I have a Fiskars Slide Out Camping Saw that I use to cut down the sapling. As always, be careful, even saplings can be large and unwieldy. I have been stabbed by a few falling saplings because they are EXTREMELY top heavy. If you have not cut down a tree before, here is a good how to: wikihow to fell a tree. The important part is using the wedge cut to direct the fall AWAY from you. If you need a big saw, the sapling is too big.
Once I have the sapling (I usually get about three or four) I take them back to my workshop and start peeling the bark. The bark helps seal moisture in and moisture, as you will see in a minute, is your enemy. Releasing the moisture by stripping the bark has another benefit--the wood underneath is both smooth and beautiful. Bark can add texture and you CAN leave it on, I just don't see why. The drier it is, the easier it is to peel the bark. I use a putty knife sharpen on a file. If it is really dry, the bark will come off in big banana peels. If not it will nick off. If the bark is really on the stick, sometimes I just let it dry and then sand it off.
After I have peeled the stick, I place them in long, straight PVC tubes. Any plumbing or home store will have them. I have two tubes and I can dry three sticks at once. Take a piece of masking tape and date the tube. If you let them linger too long without taking them out, they will get rotten and moldy as the moisture has no place to go. About once every two weeks, uncap the tube take the stick out, clean it off, and then take a wad of paper towels, stuff it in the tube, and use the stick to push it all the way through. If the tube is REALLY messy, seal up one end, drop some bleach in there, shake it around, and then pour it out. The big thing is you have to make sure the drying tube is dry itself, as the wood has a TON of moisture inside. After about 3-6 months, depending on the ambient humidity, the sticks should be dry enough to sand.
One thing you have to be worried about is checking. If the sticks dry too fast, like if they are simply exposed to the surrounding air after being debarked, they will develop large, structurally weakening cracks. The drying tubes allow you to crudely control humidity and this prevents checking. There will be SOME checking no matter what, but if you do it right, in the drying tube, it will only be at the ends (or end, if you used a crotch or branch to make a handle, the wood is denser here). You can also seal the ends of the sticks to prevent cracking by making a parafin cap from an old candle. I have never bothered because the drying tubes work so well, but some people swear by them.
Once the sticks are dry I sand them using an Random Orbital Sander. The sanding is very messy, but the goal is to cut through the brown-orange skin and get to the bone white wood. Sometimes you find surprises, like my stick has some heavy spalting. I go from 60 to 120 to 320 to 600 grit. I also use a rasp attachment for my Dremel to work out any sharp knots and to accentuate the natural shape of the handle. If there is not a natural handle I like to round off the end to make a nice knob. I use a belt sander to do this, shaping the stick by bringing the stick to the sander. The other way around is a bit too awkward for nice and consistent results.
After the sanding I use a tack cloth or wet paper towel to clean the wood. I then let it sit for a day and finally I apply the varnish. You can stain the stick beforehand, but they tend to be splotchy, so I don't recommend it (I stained a stick once and it looks okay, but not great). The varnish I use is a spar varnish, in particular Minwax's Helmsman Spar Varnish. Spar Varnish is designed for marine applications and it is very thick. It is very durable and water resistant, making it an excellent finish for a hiking stick that will be scrapped and banged against rocks and trees all its life. I suggest cutting it 1:1 (one unit varnish to one unit thinner) with paint thinner before applying it. This will allow you to build up coats but not cause lumping or bubbling. I usually do about 5-10 coats. Spar varnish is not as glossy as other varnishes, so getting the wood to shine takes a lot of coats (thinner coats work best) and effort. I usually use a 320 and 600 grit sheet of sand paper to hand sand the finish between coats. Once the coat is on I let it dry for a day and then repeat the process.
For the final coat I like to wet sand the entire surface and then apply the varnish. Once the final coat is on I wet sand it again and then apply paste wax. Once the wax has set (it will be tacky to the touch) I buff it out to give the wood a gleaming, super strong finish. I usually attach a lanyard somewhere (through a knot if possible, it looks cool) and the get a rubber ferrule and attach it to the bottom. I like contact cement, but sometimes it is unnecessary. Buy a few, as they do wear out. I have tried a fancy brass ferrule and they don't work all that well, adding weight and not much else.
Other than the time for the drying process and the peeling, it will take about an hour a day for about five days (depending on the number of coats). All told I probably spend around 10-15 hours on each stick from the time I cut it down until I give it to someone to use, excluding, of course the months of drying.
After about a year you may have to refinish the stick. Just reapply the last two coats of varnish after you rough up the finish a bit. You may also have to replace the ferrule, actually you DEFINITELY will have to replace the ferrule. Just pop it off or cut it off (the bottom will be worn away so it will be like a collar around the bottom of the stick) and apply another one. If you do these two things and don't fight sword wielding maniacs, your stick will last indefinitely. I have one that is five years old and it looks and feels brand new.
If you are far from trees or short on tools and/or time, you could just go get a broom handle or a wheelbarrow handle and finish it to save time, but that is a little too boring if you can cut down your own tree.
As an adult, moving away and going to college and then law school and now into my own home, those hiking sticks are long gone. But with a new little boy, my wife and I have started walking and hiking again. So I went out into the woods near my current house (no where near as impressive as the sweep of emerald green that surrounded my neighborhood when I was a kid) and found a stand of young maple. They were part of a deforesting effort to get a passenger rail system into my current town, so the stand is full of thin, straight maple. There are too many to have all of them survive and even now, some of the smaller ones are dying out. They are sugar maple and they grow in nice, straight stands. They also make excellent hiking sticks.
Here is my current stick:
and a close up of the "handle":
The hiking stick has probably about 600 miles on it right now and it has held up well. It is something I carry every night when we go for a walk or any time I am hiking. In addition to their wilderness utility, they also make great defensive items, if need be, something short of a knife or a gun and much more innocuous looking. They beat the tar out of the aluminum ones in terms of style. Below is a tutorial on how to make your own.
Supplies You'll Need
You'll need:
1. A saw (a bow saw or a garden saw are perfect)
2. A length of PVC tubing with two end caps
3. Foam brushes
4. A putty knife or scraper
5. Different grit sand paper, I like 60, 120, 320 and 600, with a fine grit that can be used to wet sand (it will say "Dry/Wet" on it)
6. A length of cord (I used paracord)
it is nice to have:
1. A palm sander (Random Orbital type)
2. A belt sander
3. A Dremel rotary tool with rasp and sanding attachments
Selecting the Wood
Ideally you will use a hard, straight grained, wood. Closed grain woods (like maple) are superior for finishing compared to open grained woods (like oak and ash). Traditionally, hiking sticks were made out of hickory, willow, ash, or maple. Irish sticks were also made of blackthorn (which, technically, is a shrub and not a tree). Willow is a good choice if you want a "bark on" look. Hickory is especially tough and strong, which is good in the sense that it will take some abuse, but bad in the sense that it is very hard to work with. I would skip pine, though pine can be tempting because it is straight, light, and abundant. It is just not strong enough for this application. Also, if you can find a root that is straight, roots are denser wood than trunk wood, so they are more durable. Be careful though, because cutting up a root could kill the tree. If the tree is already dying, go for it, but otherwise cut off a branch or go after a small sapling. Maple is my preference. It is a nice combination of hard yet workable, straight, and closed grained. I also like the creamy heart wood's coloration and pattern. Sometimes you get lucky and find some crazy pattern or spalting.
Choosing a sapling is pretty easy. I like to have natural handles, so I always look for a crotch or branch in the tree. I also like them to be no bigger around than my index finger and thumb when making the "OK" sign. I then go down from there about 6 feet. You will cut off a bit of the end, so select more than you need. You can always make it shorter, but the reverse is not true. Finally, sight up the side of the sapling to make sure it is straight. It doesn't need to be poll cue straight, but the straighter the better. Then start cutting.
The stick should be one of two sizes: shoulder height for a staff and elbow height for a walking stick. I prefer the elbow height sticks. They pace your walking well and are easier to store and carry.
Making the Stick
I have a Fiskars Slide Out Camping Saw that I use to cut down the sapling. As always, be careful, even saplings can be large and unwieldy. I have been stabbed by a few falling saplings because they are EXTREMELY top heavy. If you have not cut down a tree before, here is a good how to: wikihow to fell a tree. The important part is using the wedge cut to direct the fall AWAY from you. If you need a big saw, the sapling is too big.
Once I have the sapling (I usually get about three or four) I take them back to my workshop and start peeling the bark. The bark helps seal moisture in and moisture, as you will see in a minute, is your enemy. Releasing the moisture by stripping the bark has another benefit--the wood underneath is both smooth and beautiful. Bark can add texture and you CAN leave it on, I just don't see why. The drier it is, the easier it is to peel the bark. I use a putty knife sharpen on a file. If it is really dry, the bark will come off in big banana peels. If not it will nick off. If the bark is really on the stick, sometimes I just let it dry and then sand it off.
After I have peeled the stick, I place them in long, straight PVC tubes. Any plumbing or home store will have them. I have two tubes and I can dry three sticks at once. Take a piece of masking tape and date the tube. If you let them linger too long without taking them out, they will get rotten and moldy as the moisture has no place to go. About once every two weeks, uncap the tube take the stick out, clean it off, and then take a wad of paper towels, stuff it in the tube, and use the stick to push it all the way through. If the tube is REALLY messy, seal up one end, drop some bleach in there, shake it around, and then pour it out. The big thing is you have to make sure the drying tube is dry itself, as the wood has a TON of moisture inside. After about 3-6 months, depending on the ambient humidity, the sticks should be dry enough to sand.
One thing you have to be worried about is checking. If the sticks dry too fast, like if they are simply exposed to the surrounding air after being debarked, they will develop large, structurally weakening cracks. The drying tubes allow you to crudely control humidity and this prevents checking. There will be SOME checking no matter what, but if you do it right, in the drying tube, it will only be at the ends (or end, if you used a crotch or branch to make a handle, the wood is denser here). You can also seal the ends of the sticks to prevent cracking by making a parafin cap from an old candle. I have never bothered because the drying tubes work so well, but some people swear by them.
Once the sticks are dry I sand them using an Random Orbital Sander. The sanding is very messy, but the goal is to cut through the brown-orange skin and get to the bone white wood. Sometimes you find surprises, like my stick has some heavy spalting. I go from 60 to 120 to 320 to 600 grit. I also use a rasp attachment for my Dremel to work out any sharp knots and to accentuate the natural shape of the handle. If there is not a natural handle I like to round off the end to make a nice knob. I use a belt sander to do this, shaping the stick by bringing the stick to the sander. The other way around is a bit too awkward for nice and consistent results.
After the sanding I use a tack cloth or wet paper towel to clean the wood. I then let it sit for a day and finally I apply the varnish. You can stain the stick beforehand, but they tend to be splotchy, so I don't recommend it (I stained a stick once and it looks okay, but not great). The varnish I use is a spar varnish, in particular Minwax's Helmsman Spar Varnish. Spar Varnish is designed for marine applications and it is very thick. It is very durable and water resistant, making it an excellent finish for a hiking stick that will be scrapped and banged against rocks and trees all its life. I suggest cutting it 1:1 (one unit varnish to one unit thinner) with paint thinner before applying it. This will allow you to build up coats but not cause lumping or bubbling. I usually do about 5-10 coats. Spar varnish is not as glossy as other varnishes, so getting the wood to shine takes a lot of coats (thinner coats work best) and effort. I usually use a 320 and 600 grit sheet of sand paper to hand sand the finish between coats. Once the coat is on I let it dry for a day and then repeat the process.
For the final coat I like to wet sand the entire surface and then apply the varnish. Once the final coat is on I wet sand it again and then apply paste wax. Once the wax has set (it will be tacky to the touch) I buff it out to give the wood a gleaming, super strong finish. I usually attach a lanyard somewhere (through a knot if possible, it looks cool) and the get a rubber ferrule and attach it to the bottom. I like contact cement, but sometimes it is unnecessary. Buy a few, as they do wear out. I have tried a fancy brass ferrule and they don't work all that well, adding weight and not much else.
Other than the time for the drying process and the peeling, it will take about an hour a day for about five days (depending on the number of coats). All told I probably spend around 10-15 hours on each stick from the time I cut it down until I give it to someone to use, excluding, of course the months of drying.
After about a year you may have to refinish the stick. Just reapply the last two coats of varnish after you rough up the finish a bit. You may also have to replace the ferrule, actually you DEFINITELY will have to replace the ferrule. Just pop it off or cut it off (the bottom will be worn away so it will be like a collar around the bottom of the stick) and apply another one. If you do these two things and don't fight sword wielding maniacs, your stick will last indefinitely. I have one that is five years old and it looks and feels brand new.
If you are far from trees or short on tools and/or time, you could just go get a broom handle or a wheelbarrow handle and finish it to save time, but that is a little too boring if you can cut down your own tree.